Wordless Wednesday - Week of October 29, 2013

Update November 6, 2013
Here's a link going directly to our entry:


Max, the Badboy and our bridal dog is joining a contest hosted by The Pinoy Dog Whisperer.
The prize?

FREE training!

Although, he had changed (for the better) a lot during the past few months, Kiboy (his Master) would still want him to have a training under the dog whisperer.

So, please help him win by visiting this link https://www.facebook.com/photo.php?fbid=574485972623292&set=a.331150900290135.75512.328051677266724&type=1 or this http://extraordinairememoir.blogspot.com/2013/10/the-pinoy-dog-whisperer-free-training.html. Once you're there, look for the entry (comment) of Mark Liwag then LIKE it.


Ooops! Sorry! I know, this should be wordless but I just can't help it.  I really want Max to win and have that free training in the hope that he'll be nicer to me and won't scare me off each time I would arrive home from work.

Thank you in advance!

The Pinoy Dog Whisperer Free Training

Update November 6, 2013
Here's a link going directly to our entry:

I rarely make requests - at least over the internet - but this one is different. You know, supporting the husband on his endeavor 
So, what's my request?
Click the link below and look for Max 'badboy' Liwag then click like. The top 10 dogs with the most likes will have a chance to get a free training from The Pinoy Dog Whisperer. 
Maybe not much for some, but the husband wants (badly wants) that for our bridal dog, Max.

https://www.facebook.com/photo.php?fbid=574485972623292&set=a.331150900290135.75512.328051677266724&type=1

And oh, liking my post (this) is appreciated but it won't count as a vote so please open the link above and like our Max from there. Thank you!

Voting/liking is open until November 17, 2013 5pm.  Below is our entry.


*entries are found on the comment section of the facebook link above

Chicken Soup for the Soul

I so love eating chicken sopas especially during rainy days because it makes me warm.  I have posted months ago my very own version of chicken sopas here.

In 1997, while attending the summer school for our scholarship, I was introduced by one of our tutors to Chicken Soup.  That chicken soup was really different - it's not for the stomach but for the Soul.  I enjoyed reading each and every story in the book because with each story
> I learn lessons in life that the regular school can't teach
> I get encouraged to continue living life to the fullest despite the many challenges that life is throwing at me
> and many more which I can't really express here

Among the many titles and stories that the series had offered, the following are my favorites:

> Title:  Chicken Soup for the Woman's Soul.  I bought a copy of this but unfortunately, someone borrowed it and never said a word after.  In short, the book was never returned to me.  The good thing was, I was able to read all of the stories there.  But I still want the book.  You know that feeling when you just want to open a favorite book and read then re-read the already familiar stories?  That's the reason why I want to have my book back. :(

> Story: Falling In Love With Molly.
"Sometimes, being a brother is even better than being a superhero." - Marc Brown.  That statement basically sums up the story.  So go ahead, read it.  I'm sure, you'll love it.

> Category:  On Death and Dying.  The stories under this category remind the readers to tell the people they love that they love them while they are still alive, while there is still time to enjoy each other's company, while they can still feel the love.

> And oh, the Calvin and Hobbes portion!

Below are just some of the Chicken Soup titles currently on Amazon.com.


To get the full list, go here => http://amzn.to/1cfXyhC

I have stopped buying the book because of that unfortunate incident above but I have continued reading the inspiring stories by subscribing on their free daily story.  However, awhile ago, while checking on the other Wordless Wednesday links at Create-With-Joy, I noticed that she has an on-going giveaway check it here.  And the best thing about it?  The prize is the awesome Chicken Soup for the Soul From Lemons to Lemonade!  I started wanting a hard copy again.

So, without wasting a second, I joined.  Crossing my fingers and hoping that I be named as one of the winners.  Yes, that's right.  There will be not one, not two but three winners.  In the past, I am not that lucky on raffles/giveaways but I hope I will be this time.
/i am yet to get the maximum number of entries/

May the force be with me!


30th Birthday Celebration: 10/21/13 Update


Yes, it's OUR birthday.  When She learned of my plans to celebrate my 30th birthday on an orphanage, she got overly excited and expressed her intentions of doing the same. Ressie, on the other hand was convinced by She to join us, too.  :)

I will post more updates in the coming days and the pictures of the two other celebrants.


Good night, everyone!

Weekender: Home Enhancements

I just want to share the enhancements I have recently made on our living room and bedroom.
The stuffs that I have used are on 50% off sale which we bought during SM's 3 day sale.
Remember the bags here?  Yes, they contain my newly bought curtains.


I bought the throw pillows and their cases at SM Mega Mall during its 2nd day of sale.


For the living area, I spent only a total of 1,790 pesos.
Curtain at 300 pesos each (2 pcs) = 600
Throw pillows at 120 pesos each (7 pcs) = 840
Pillow cases at 50 pesos each (7 pcs) = 350

All of them were on 50% discount so my total savings is 1,790 pesos!

For our bedroom, I have replaced the curtains with a new set to match the ones in the living room.


My blogging area :)
So for the bedroom, I only spent 600 pesos for the two curtains.

I seriously think, I need to put a chandelier in the living room, what do you think?
The dining area and the kitchen will be enhanced next week so stay tuned.

Happy weekend and happy week ahead!

I Can Be Crafty, Sometimes

Aside from the occasional birthday cards that I have created for friends for the last couple of years or so and the birthday as well as baptismal invitations that I have created for my nephews, I haven't really been into crafts.

There are projects left unfinished because some materials were often out-of-stock or sometimes, I simply would rather choose to sleep than do them.

However, there are things that you really can't get from the store or you'd need to pay a lot just to have them. But to me, paying a lot is never an option.

So when our wedding date was set, I started to pull together all the creativity I could muster because most of the little details (based on how I wanted them to be) were very expensive.

Here are some of my creations for our wedding:

The Traditional Filipiniana Dress
- the base gown is the one I used for one of my friend's wedding wherein I was her maid of honor
- I added a panuelo (shawl) made of lace
- I also added a tapis (overskirt) which is made of a piece of fabric I bought in Divisoria a couple of days prior the pictorial. Hand sewed.
- My friend was not able to recognize the gown after I had transformed it into a Filipiniana dress


The Logo
- Since we don't have a theme for our wedding, I just created a logo of sort to be placed on all (or almost all) stuff for consistency of design
- We had it on our invitation, missalette, candles, souvenirs, table numbers and all printed stuffs
- Printed on sticker paper and covered with clear tape


The Invitation and Missalette
- I created the design for our missalette as well as the design/layout of the invitation
- Our invitation is like a photo book. Hand made by: Groom, Bride and Maid-of-Honor :)  But the bride is the primary creator :)


The Unity Candles
- Bought the candles at SM Department Store
- The brown fabric was originally a belt cut into three and wrap around each candle.
- Logo was place in the middle.


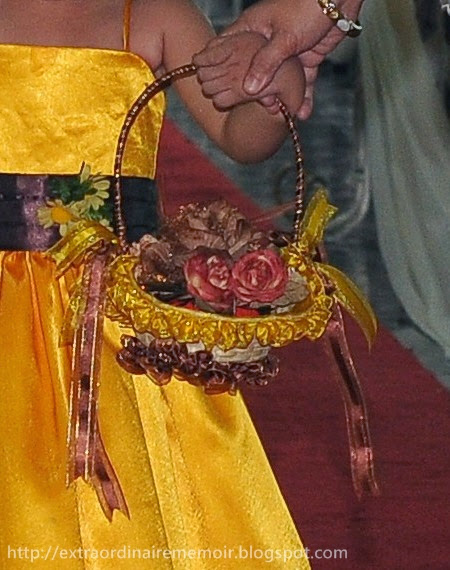
The Flower Girl Basket
- Bought the basket at Farmer's Plaza
- Hand-sewed a ribbon on both the top and bottom of the basket
- The handle was wrapped with a ribbon, too
- Bought the fabric flowers in Divisoria and pinned to a styrofoam which was attached to the basket


The Bridal Bouquet
- When I was young, I told myself that my wedding bouquet would be unique
- While browsing a wedding magazine, I saw a beaded bouquet and I fell in love with it.
- However, I don't want to spend 37K pesos for a bouquet so I decided to create this for myself


The Wedding Gown
- Ooops! It's not like I sewed my gown.  It's just that, I created the design for it.  Well, most of it.
- You may also check this and this for some other shots of the gown


So there, I hope to add more crafts in the coming days and months and years.
If you wish to know how to do any of these, just shoot me an email or leave a comment below.

Happy weekend!

My Secret Santa Day 2


Look!
This is what I got from my Secret Santa for October 15, 2013.  By the way, we exchanged gifts just today, October 17, since we were not able to find a common time yesterday and October 15 was declared as a holiday (I was not in the office*wink*)!


The theme for this gift giving is : Round and Small.

Whoever that Secret Santa is

THANK YOU!


*the original santa picture above is from google images

Wordless Wednesday - Week of October 15, 2013

This is my very first entry for the Wordless Wednesday blog hop.


Shot by Richmond Sarreal for our wedding last March 17, 2012


How to Make a Blog Button and Grab Button Code

In this post, I will try to enumerate as much as I can, the steps on how to create a blog button.
But first, what is a blog button?

A blog button, also a blog badge is a great way of promoting your blog.  It would provide you a link back to your blog when other people have it on their websites/blogs.

For this blog, I used my favicon as my button - so I won't need to create another design. :)


Here's what you'll need:
1. Blog button design
2. An online photo server

For the blog button, what you need to do is to create a design that would represent your blog.  You may use Photoshop to create one.  But if you don't have that, you may use other applications/software.

Guess what, mine was created in MS PowerPoint though at first I thought of creating it on Paint.  I really don't wish to buy another application just to create a blog badge so I just used whatever is currently installed in my laptop.

If you used MS PowerPoint, you just have to save it as .jpg, crop whatever excess borders and you'll already have a design.
If you use Paint, you'll have to save it as .jpg instead of .bmp.

What is important is for you to end up with a picture. :)
And if you do not want to create a design, you may just look for a picture in the web that best describes your blog and save it on your computer.  Though I don't recommend this because of property rights and those stuffs. You really have to be careful with that.

Once you already have the picture, you may change it's size to the approximate size of your sidebar. You don't want it to ruin the overall look of your blog right?
In my case, I just used MS office Picture Manager - nothing fancy :)  Though you may also use some other photo editing application like Picmonkey: http://www.picmonkey.com it's for free :) at least as of this writing.

Here's how to do it on Picmonkey:

Click Edit Photo.  By doing so, you will be directed to choose the picture you'd want to edit.  Just choose it.  If it's on your computer, just get it from the directory where you originally saved it.


You should see the photo to be edited at the center page.  Now, click Resize (encircled in red below).


The resize option will be shown.  According to the websites I recently read, the recommended photo size is 125 x 125 but I think, depending on your photo's resolution, you may have it bigger or other shapes - rectangular for example.

Once you're done, click Apply.


There are other options on how you can edit your photo.  Just play with them.
After which, click Save.


Here's how to do it on MS Office Picture Manager:

On your photo, right click and choose Open With then select MS Office Picture Manager.
Then click Edit Pictures


The edit options will be shown on the right side.  Click resize.


Resize as you please.  But again, consider your photo's resolution and how big you really want your badge to be.  Click save afterwards.


Now, you are ready to upload your photo to an online photo server.  Mine was uploaded on a Picasa Web Albums but you may also use Photobucket, Flickr or any other photo sharing server.

How to Upload your Photo on Picasa Web Album.

Make sure you are signed in.  Then, choose upload photo


You will then be asked to choose the file to be uploaded.


Click done to finish the photo upload


You should be able to see the newly uploaded photo on your list.


Click the image to open the album.  Then click again to view the photo.  You should see something like this:


Finally, right click on the image and choose Copy Image URL.  Save it on a notepad or anywhere.  You will be needing that later.


You are almost DONE!

Now, for the code itself, I have already done the research so it wouldn't be difficult for you, how fun is that?  I got this from different websites and made some changes depending on the location where I want my blog button/badge to redirect the visitor.

Okay, so here goes.
Just get the codes below and enter your own URLs.

Redirect to Main Page:

<a href="Your Blog URL" target="_blank" title="Your Blog Title"><img alt="Your Blog Title" src="Your Image URL" /></a>

Mine would look something like this:

<a href="http://www.extraordinairememoir.blogspot.com/" target="_blank" title="Memoir Extraordinaire"><img alt="Memoir Extraordinaire" src="https://blogger.googleusercontent.com/img/b/R29vZ2xl/AVvXsEjQXWtpmzijMqCNJ0ZotfgYagX4SVR8DfUESynkz5ucYq-JV4TQUAmJgGbXSMPQAfnQmrKCuaLED6lp3ilJZkFOoxTg4vhU-gx9aCYR1LMDbXBTmmqHYFHrpJY_nCUwjxT6R4f29zH2a2lj/s201-no/memoir+extraordinaire+blog+button+2.jpg" /></a>

Redirect to a set of posts with the same label

<a href="Your Blog URL/search/label/Your Label/" target="_blank" title="Your Blog Title"><img alt="Your Blog Title" src="Your Image URL" /></a>

When I created my Stop.Blog.Hop button, I opted for it to be redirected to all posts with Stop.Blog.Hop label so the code looked like this:

<a href="http://www.extraordinairememoir.blogspot.com/search/label/stop.blog.hop/" target="_blank" title="Memoir Extraordinaire"><img alt="Memoir Extraordinaire" src="https://blogger.googleusercontent.com/img/b/R29vZ2xl/AVvXsEhtOjs4tuYChXifnUCHlu10v3u7b-LuW2MP_pbPfcJX40vKmzUi6dHHGD32hmCvnuUfgzoStxA4oRKeyoE69NZ84vidIezzZjyHN_DjaOEQFBkaZAYJfhkotPp1z0TAn_Ry7P62MbHzLVzx/w202-h203-no/stop+blog+hop+button.jpg" /></a>

Redirect to a certain post

<a href="Your Post URL" target="_blank" title="Your Blog Title"><img alt="Your Blog Title" src="Your Image URL" /></a>

Mine would look something like this:

<a href="http://extraordinairememoir.blogspot.com/2013/10/quotable-quote-ad-spot-winner.html/" target="_blank" title="Memoir Extraordinaire"><img alt="Memoir Extraordinaire" src="https://blogger.googleusercontent.com/img/b/R29vZ2xl/AVvXsEjQXWtpmzijMqCNJ0ZotfgYagX4SVR8DfUESynkz5ucYq-JV4TQUAmJgGbXSMPQAfnQmrKCuaLED6lp3ilJZkFOoxTg4vhU-gx9aCYR1LMDbXBTmmqHYFHrpJY_nCUwjxT6R4f29zH2a2lj/s201-no/memoir+extraordinaire+blog+button+2.jpg" /></a>

Now, add those codes to your sidebar.
If you are using Blogger platform, go to Layout then Add gadget.  On the Add Gadget option, select Add HTML/Java Script.


Wait there's more.

If you want a Grab box in addition to the button, add this code to the codes above:

Redirect to Main Page:

<textarea style="background:#f0f0f0;border: solid 1px #cccccc; color: #777777; font-size:100%; height: 50px; margin:auto; text-align: left; padding: 7px 0 2px 5px; display: block;  width: 90%;">&lt;div align="center">&lt;a href="Your Blog URL" title="Your Blog Title"&gt;&lt;img src="Your Image URL" alt="Your Blog Title" style="border:none;" /&gt;&lt;/a&gt;&lt;/div></textarea></pre>

Redirect to a set of posts with the same label

<textarea style="background:#f0f0f0;border: solid 1px #cccccc; color: #777777; font-size:100%; height: 50px; margin:auto; text-align: left; padding: 7px 0 2px 5px; display: block;  width: 90%;">&lt;div align="center">&lt;a href="Your Blog URL/search/label/Your Label" title="Your Blog Title"&gt;&lt;img src="Your Image URL" alt="Your Blog Title" style="border:none;" /&gt;&lt;/a&gt;&lt;/div></textarea></pre>

Redirect to a certain post

<textarea style="background:#f0f0f0;border: solid 1px #cccccc; color: #777777; font-size:100%; height: 50px; margin:auto; text-align: left; padding: 7px 0 2px 5px; display: block;  width: 90%;">&lt;div align="center">&lt;a href="Your Post URL" title="Your Blog Title"&gt;&lt;img src="Your Image URL" alt="Your Blog Title" style="border:none;" /&gt;&lt;/a&gt;&lt;/div></textarea></pre>

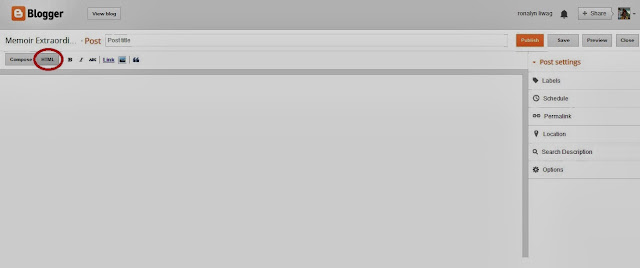
And if you wish to have it as a blog entry/post do this:
Select Add a New Post then click HTML and paste the code or codes if you want both the button and the grab box.


Your button with the grab box should look like this


I hope this helps!
Let me know if you have any clarification.

Thank you for dropping by.

Quotable Quote Ad Spot Winner!

The winner for the Quotable Quote Ad Spot is:


Catherine Wood is the amazing lady behind http://happilyevercrafterz.blogspot.com.  Click the link to read more about her cooking and crafting escapades!

Congratulations!

Thank you so much to all the participants.  I really appreciate it.  I know that the prize isn't that big but I really love seeing you around here and your thoughts had inspired me a lot.

Until next time :)


Note to Self 10/14/13


Weekender: The Gift of Family - Meet the Newest Christian in the House!


Zent Ivan sucking his thumb

The Oil
The Water
Ivan was not so happy with the water
Lighting of the Candles
Picture picture!  I was behind the camera. :(
Welcome to the Christian World, Zent Ivan!